Building a Deep Learning Model with Keras and TensorFlow
Build a Handwritten Digit Recognizer with Deep Learning Keras and TensorFlow

I'm a Machine Learning Engineer passionate about building production-ready ML systems for the African market. With experience in TensorFlow, Keras, and Python-based workflows, I help teams bridge the gap between machine learning research and real-world deployment—especially on resource-constrained devices. I'm also a Google Developer Expert in AI. I regularly speak at tech conferences including PyCon Africa, DevFest Kampala, DevFest Nairobi and more and also write technical articles on AI/ML here.
Introduction
What is Deep Learning?
Deep learning is a branch of artificial intelligence and machine learning that seeks to imitate the learning and decision-making capabilities of the human brain. This involves training intricate neural networks with layers upon layers to analyze and extract advanced features from raw data. By learning from large amounts of labeled data, these networks can identify patterns, classify objects, and make predictions. With its breakthrough advancements, deep learning has transformed countless industries such as computer vision, natural language processing, and speech recognition, surpassing the performance of traditional machine learning algorithms in many formerly difficult tasks.
What is Keras?
Are you familiar with Keras? It's a Python-based, open-source neural network API designed to simplify the process of building, training, and deploying deep learning models. Keras was created with user experience in mind, allowing developers and researchers to experiment with different neural network architectures without getting bogged down in the complexity of lower-level deep learning libraries like TensorFlow or Theano. With its flexible and modular structure, users can easily stack and connect layers to create complex models. Keras is widely used in various domains due to its simplicity and powerful capabilities.
What is TensorFlow?
TensorFlow is a deep learning framework developed by the Google Brain team. It's an open-source platform that offers a vast array of tools, libraries, and resources to create and implement machine learning and deep learning models. With TensorFlow, you can define and train neural networks using a flexible and symbolic dataflow graph representation. This graph structure allows for efficient parallel computations and optimization, making it possible to run on CPUs, GPUs, and even specialized hardware like TPUs (Tensor Processing Units). Its versatility, scalability, and performance have made TensorFlow a popular choice for academia, research, and industry, playing a crucial role in advancing deep learning applications and research.
Building a Deep Learning Model
In this article, we will guide you through the process of building your very first Keras classifier using the well-known deep-learning library Keras. We aim to create a basic image classification model that can accurately classify images of handwritten digits from the MNIST dataset. Before starting, please ensure that you have installed both Keras and TensorFlow. If not, you can easily install them using pip, if you haven't already:
pip install tensorflow
pip install keras
Import the necessary libraries
Here, we import the required libraries for building our deep learning model. We'll be using TensorFlow and Keras for creating and training the neural network. Additionally, we import specific modules and functions for loading the MNIST dataset, defining the model architecture, and data preprocessing.
import numpy as np
import tensorflow as tf
# MNIST dataset is included in Keras
from tensorflow.keras.datasets import mnist
# Model type
from tensorflow.keras.models import Sequential
# Types of layers to be used in our model
from tensorflow.keras.layers import Conv2D, MaxPooling2D, Flatten, Dense, Dropout
from tensorflow.keras.utils import to_categorical
Load and preprocess the MNIST dataset
We have to load the MNIST dataset using the mnist.load_data() function from Keras. The dataset consists of 28x28 grayscale images of handwritten digits (0 to 9). We split the dataset into training and testing sets. Then, we normalize the pixel values of the images to range between 0 and 1 by dividing all pixel values by 255.0. This normalization helps the model converge faster during training. We also one-hot encode the class labels, converting them into binary vectors representing the corresponding digit.
# Load the MNIST dataset
(x_train, y_train), (x_test, y_test) = mnist.load_data()

# Normalize the pixel values to range [0, 1]
x_train = x_train.astype('float32') / 255.0
x_test = x_test.astype('float32') / 255.0

# One-hot encode the labels
y_train = to_categorical(y_train, 10)
y_test = to_categorical(y_test, 10)

# Add a channel dimension for Conv2D (for grayscale images)
x_train = np.expand_dims(x_train, axis=-1)
x_test = np.expand_dims(x_test, axis=-1)
Build the CNN model
A Convolutional Neural Network (CNN) is a type of deep learning model particularly effective for image recognition tasks. We can use Keras's API to define the CNN architecture. The CNN model is made up of several layers:
Convolutional Layers: We include three 2D convolutional layers with increasing numbers of filters (32, 64, and 128) and small filter sizes (3x3). The activation function used is ReLU (Rectified Linear Unit), which brings non-linearity to the model.
MaxPooling Layers: Following each convolutional layer, we add a 2D MaxPooling layer with a pool size of (2, 2). MaxPooling is responsible for decreasing the spatial dimensions of the feature maps, which aids in extracting the most important information while reducing the computational load.
Flatten Layer: We then add a Flatten layer that converts the 3D feature maps into a 1D vector, which will serve as input for the fully connected layers.
Dense Layers: After the Flatten layer, two fully connected Dense layers are added. The first Dense layer has 128 neurons and employs ReLU activation. We also add a Dropout layer with a dropout rate of 50% to prevent overfitting. The second Dense layer consists of 10 neurons (one for each digit) with a softmax activation function, which outputs probabilities representing the predicted class probabilities for each image.
model = Sequential()

# Convolution Layer 1
model.add(Conv2D(32, (3, 3), activation='relu', input_shape=(28, 28, 1)))
model.add(MaxPooling2D((2, 2)))

# Convolution Layer 2
model.add(Conv2D(64, (3, 3), activation='relu'))
model.add(MaxPooling2D((2, 2)))

# Convolution Layer 3
model.add(Conv2D(128, (3, 3), activation='relu'))
model.add(MaxPooling2D((2, 2)))

# Connected Layer 4
model.add(Flatten())
model.add(Dense(128, activation='relu'))

# Connected Layer 5
model.add(Dropout(0.5))
model.add(Dense(10, activation='softmax'))
Compile the model
We can now compile the model using the compile() function. During compilation, we define the loss function and the optimization algorithm. Since we are dealing with a multi-class classification problem, we use the categorical_crossentropy loss function, which is appropriate for this scenario. We also specify the Adam optimizer, a popular and effective optimization algorithm. Additionally, we can choose to track other metrics like accuracy during training.
# Use the Adam optimizer for learning
model.compile(loss='categorical_crossentropy', optimizer='adam', metrics=['accuracy'])
Train the model
After compiling the model, we move on to training it on the training dataset. We specify the number of training epochs (how many times the model will see the entire dataset) and the batch size (the number of samples the model will process before updating its parameters). We use the fit() function to train the model, passing the training data and labels. During training, the model adjusts its weights and biases to minimize the defined loss function and improve its accuracy on the training data.
# Set the number of training epochs and batch size
epochs = 10
batch_size = 128
# Train the model
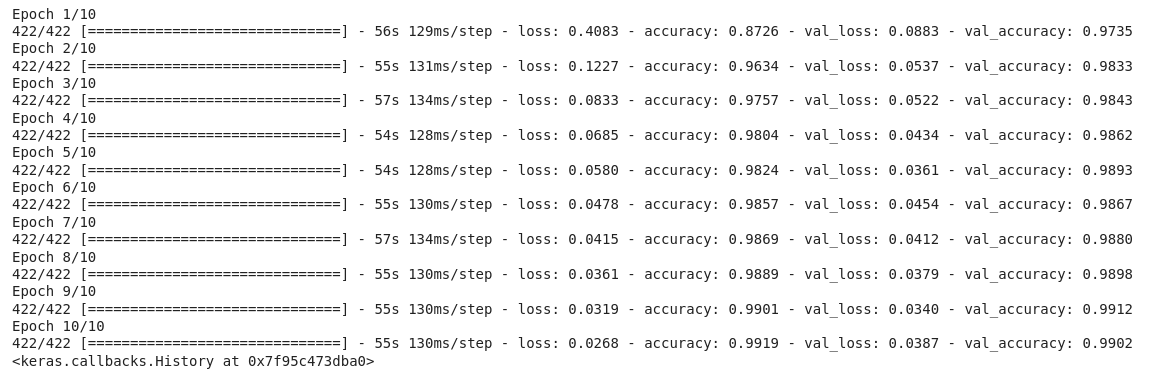
model.fit(x_train, y_train, epochs=epochs, batch_size=batch_size, validation_split=0.1)
Output:
Evaluate the model
Once the model is trained, we evaluate its performance on the test dataset using the evaluate() function. The model is not trained on the test set; instead, we use this set to assess its generalization performance. The function returns the loss value and the accuracy achieved on the test set. A high accuracy indicates that the model is capable of recognizing handwritten digits from unseen data.
loss, accuracy = model.evaluate(x_test, y_test)
print(f'Test loss: {loss:.4f}, Test accuracy: {accuracy:.4f}')
Output:

Test loss: 0.0494
Test accuracy: 0.9869
Make Predictions
Finally, we can use the trained model to make predictions on new data.
predictions = model.predict(x_test[:3])
predicted_labels = np.argmax(predictions, axis=1)

print("Predicted label:", predicted_labels)
print("True label:", y_test[:3])
Output:

Conclusion
To wrap things up, we went through the steps of constructing a deep learning model with Keras and TensorFlow to train on the MNIST dataset of handwritten images. I hope this has given you a strong basis for constructing and training deep learning models. You now have the tools to address different image recognition tasks, try out various designs, and keep exploring the amazing realm of deep learning. By practicing and experimenting more, you can apply these skills to tackle more intricate issues and delve into the latest developments in the deep learning field.
Resources
Google Colab Notebook here. (Make a Copy)
Access the Keras Official Documentation here.
Access the TensorFlow official documentation here.